
The thought of building a website from scratch can be somewhat daunting for beginners. But it doesn't need to be. In fact, coding a basic website can be extremely simple, as long as you know a few HTML tags.
Here I show you how to code your own website, then publish it to the web. It won't take long either. As you'll soon discover, building your own website is much easier than it sounds!
What is a Website?
Before we make our own website, we should understand what a website actually is.
A website is simply a collection of web pages. The web pages are usually linked together, but not always. To build a website, you simply create one or more web pages.
In order for the world to see it, the website (or collection of web pages) needs to be hosted on a web server. This web hosting is usually done by a hosting provider(otherwise known as a hosting companyor web host). A hosting provider is simply a company that provides web hosting to their customers.
What is a Web Page?
A web page is a text file that contains a combination of text and "markup" code. When the document is viewed in a web browser, it displays (or "renders") as intended. When it is viewed in a text editor (such as Notepad), it displays the text and markup code.
Therefore, a web page consists of 2 views:
The "rendered" view - This is what you see when you view the web page in your browser.
The "source code" view - This is the "behind the scenes" code that specifies the content and how the page should appear.
You can view the source code of any web page on the web. The source code will usually open in a new tab.
To do this, use your browser's View Page Source feature. For example, if you use Google Chrome, go View > Developer > View Source. If you use Firefox, go Tools > Web Developer > Page Source. Depending on your device and browser, you might also be able to right click anywhere on the page to bring up the View Source option.
There are also other options for viewing a page's source code, such as Inspect Element which allows you to open the source code in a side panel with the selected element highlighted in the source code. Developers often use this when debugging their websites.
The source code of a web page is made up of HTML tags. Some tags are mandatory (all web pages must use them), but most tags are optional. The actual tags that you use will depend on the content you want to appear.
Take a look at the following code.
Code Example 1:
<!DOCTYPE html><html> <head> <title></title> </head> <body> </body></html>
The above code can be a template for any web page. If you view the source code of any web page, you should find these tags. You might need to search for them, but they should be there.
You should be able to see the html tag near the top, and the </html> near the bottom. This is because all other HTML tags must go in between the html and </html> tags. (The only exception to this is the <!DOCTYPE...> tag, which specifies the version of HTML/XHTML the document is using. We won't go into this tag here, but if you're interested, here's more info).
The body tags contain all content to be displayed on the page. For example, if you wanted to display the words "Welcome to my web page", you would need to place them in between the body and /body tags.
Here's another example. This time, let's add some content.
Code Example 2:
<!DOCTYPE html><html> <head> <title>Hello World!</title> </head> <body> <h1>My First Webpage</h1> <p>Welcome to my first webpage!</p> <p>Here's a new paragraph...</p> </body></html>
If you were to open the above HTML file in your browser, it should look something like this:
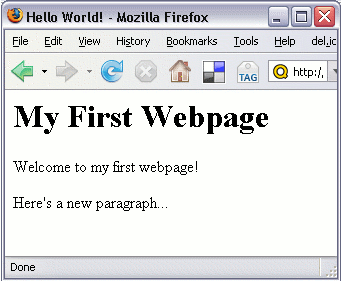
As you can see, any text surrounded by h1 and /h1 appears as a heading (heading level 1 to be exact). The text within the p tags displays as normal paragraph text. You can add as many HTML tags as you like to a web page.
There are many more HTML tags (more than 100). Some tags are used for formatting (like h1), other tags are used for displaying objects (such as images, forms, tables, etc).
How do I use this Code?
So far I've showed you the code used to create a basic web page. I've also showed you what that web page looks like in a browser. Now I'm going to show you how to do this yourself.
To create a web page like the above example, do the following:
Open up a text editor (such as Notepad or Simpletext) or HTML editor
Open a new (blank) page (eg, File > New...)
Copy the code from Code Example 2and paste it into your blank text file (or re-type it if you prefer)
Save the file as index.html (take note of where you saved it)
Congratulations! You just created your first web page!
Now, you can go ahead and view your new web page in your browser. To do this, you can double-click on the file. If this doesn't work, try opening a new browser window, then dragging the file onto it. Otherwise, depending on your browser, you should be able to go File > Open...
Adding another Web Page
Adding another web page is just as easy as creating your first one. In fact, you could just make a copy of your first one if you wanted, then modify it as you wish. For example, you could create a hyperlink so that the two pages are linked. That way, clicking on the link will display the other page.
So, let's create another web page. On this web page, we will have a hyperlink that points to our first web page. To do this, our code would look something like this.
Code Example 3:
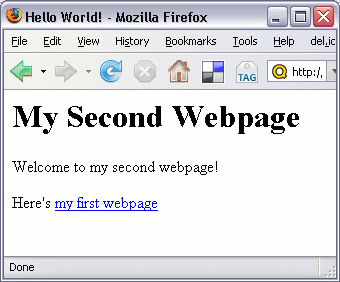
<!DOCTYPE html><html> <head> <title>Hello World!</title> </head> <body> <h1>My Second Webpage</h1> <p>Welcome to my second webpage!</p> <p>Here's <a href="index.html">my first webpage</a></p> </body></html>
The above HTML page will look like this in a browser:
So, go ahead - create your second web page. This time call it, say... page_two.html.
So, in case you've forgotten how to do this, here are the steps for creating your second web page:
Open up a text editor (such as Notepad or Simpletext)
Open a new (blank) page (eg, File > New...)
Copy the code from Code Example 3and paste it into your blank text file (or re-type it if you prefer)
Save the file as page_two.html (save it into the same directory as your previous file)
Congratulations! You've just created your second web page. You could say that you've created your first website!
Adding More Content to your Web Page
Now that you've made your first website, you can add as much content as you wish. For example, you could add more text and format it, you could add form elements, images, and much more.
Quackit provides lots of HTML codes that you can copy & paste into your own web pages. These are available at the HTML code library and the HTML examples page.
Feel free to copy/paste any of these HTML codes into your own web page and change them as you wish. Don't be afraid to experiment.
Ready to Publish Your Website?
Everything you've done so far has been on your local computer. The only people who can view your web page are those with access to your computer.
To publish your website for the world to see, you'll need to "upload" your website to a website hosting provider's server. To do this, you need to open an account with a web hosting provider. Once you've done this, you'll be able to give out your own ".com" address to anyone you want to view your website.
Opening a hosting account is usually straight forward. The hardest part is often deciding which hosting plan to use. If you're just starting out, a basic hosting plan is usually sufficient.
So, to publish your website, you simply:
Open an account with a hosting provider
Upload your web page/s (your web host will explain how to do this once you sign up)
It's that simple!
Our partner site, ZappyHost provides great hosting plans for beginners right through to professionals. (Full Disclosure: ZappyHost is a partner site and I earn a commission from any product sales).
For now, the Linux Economy plan should be more than enough. It's the cheapest plan but you get loads of features and sufficient disk space. If you have lots of photos/images for your website, you might be better off with a Deluxe or Premium plan, as these plans provide much more disk space.
If you prefer to shop around first, check out my Web Hosting Tutorial. This tutorial explains in more detail, what web hosting is, and how to choose a hosting provider.
Online Website Builders
I realize not everyone wants to spend the time learning HTML etc in order to make their own website. Many people just need to get a website up and running ASAP without getting all technical!
If that sounds like you, this online website builder by ZappyHost was made just for you! This is a tool that allows you to create a website within minutes. Simply choose a template, add content. It's that simple. Of course, you can customize your template by uploading your own images or selecting from the thousands of stock photos.
And get this... hosting and domain name is included absolutely FREE! If you like the sound of that, check it out!
(Full Disclosure: ZappyHost is a partner site and I earn a commission from any product sales).
More Resources
Here at Quackit you'll find thousands of pages of useful info regarding building websites. Below are some you might find useful for making your own website:
The Create a Website Tutorialoutlines the two main approaches to creating a website (i.e. code it yourself or use a website builder). This article shows you how to save money on a website builder account, as well as getting a free domain name in the process!
The Build a Website Tutorial is a great page to bookmark. It is the main entry point into all the tutorials regarding website development.
As mentioned, we've got Copy/Paste HTML Codes and HTML Examplesthat you can use to copy and paste into your own web pages.
And, you can always check out the Quackit homepage for a quick glance at what you can find at SAMHACKERSWORLD


Really a great post. Appreciate the effort in educating us. I was searching for Black Friday Hosting Deals and came across this blog. Thanks for sharing.
ReplyDelete